
LightningModule
模版组成
- Initialization (
__init__andsetup()). - Train Loop (
training_step()) - Validation Loop (
validation_step()) - Test Loop (
test_step()) - Prediction Loop (
predict_step()) - Optimizers and LR Schedulers (
configure_optimizers())
代码
class LitModel(pl.LightningModule):

    def __init__(...):

    def forward(...):

    def training_step(...)

    def training_step_end(...)

    def training_epoch_end(...)

    def validation_step(...)

    def validation_step_end(...)

    def validation_epoch_end(...)

    def test_step(...)

    def test_step_end(...)

    def test_epoch_end(...)

    def configure_optimizers(...)

    def any_extra_hook(...)
def init(…):
hyperparameters
Saving and loading checkpoints (basic) — PyTorch Lightning 2.5.0.post0 documentation
(1) 存储超参数 Save hyperparameters
The LightningModule allows you to automatically save all the hyperparameters passed to init simply by calling self.save_hyperparameters().
class MyLightningModule(LightningModule):
    def __init__(self, learning_rate, another_parameter, *args, **kwargs):
        super().__init__()
        self.save_hyperparameters()
(2) 访问hyperparameters
- 后续访问可以由
self.hparams.argX方式进行。同时,超参表也会被存到文件中。
self.save_hyperparameters() 在 PyTorch Lightning 中是用来将模型的构造函数中的所有参数自动保存为 self.hparams 的方法。
self.hparams会自动生成,可以考虑使用parser = ArgumentParser(),命令行传递参数
- The hyperparameters are saved to the “hyper_parameters” key in the checkpoint
checkpoint = torch.load(checkpoint, map_location=lambda storage, loc: storage)
print(checkpoint["hyper_parameters"])
# {"learning_rate": the_value, "another_parameter": the_other_value}- The LightningModule also has access to the Hyperparameters
model = MyLightningModule.load_from_checkpoint("/path/to/checkpoint.ckpt")
print(model.learning_rate)
(3) Initialize with other parameters
- 重写hyperparameters
If you used the self.save_hyperparameters() method in the init method of the LightningModule, you can override these and initialize the model with different hyperparameters.
# if you train and save the model like this it will use these values when loading
# the weights. But you can overwrite this
LitModel(in_dim=32, out_dim=10)

# uses in_dim=32, out_dim=10
model = LitModel.load_from_checkpoint(PATH)

# uses in_dim=128, out_dim=10
model = LitModel.load_from_checkpoint(PATH, in_dim=128, out_dim=10)- 补写hyperparameters
In some cases, we may also pass entire PyTorch modules to the __init__ method, which you don’t want to save as hyperparameters due to their large size. If you didn’t call self.save_hyperparameters() or ignore parameters via save_hyperparameters(ignore=...), then you must pass the missing positional arguments or keyword arguments when calling load_from_checkpoint method:
class LitAutoencoder(L.LightningModule):
    def __init__(self, encoder, decoder):
        ...

    ...

model = LitAutoEncoder.load_from_checkpoint(PATH, encoder=encoder, decoder=decoder)
def forward(…):
forward: 和正常的nn.Module一样,用于inference。内部调用时:y=self(batch)
def training_step(…)
可以使用self.log记录损失值,参考Track and visualize experiments(使用log)章节
self.log("some_value", value)class LightningTransformer(L.LightningModule):
def __init__(self, vocab_size):
super().__init__()
self.model = Transformer(vocab_size=vocab_size)
def training_step(self, batch, batch_idx):
inputs, target = batch
output = self.model(inputs, target)
loss = torch.nn.functional.nll_loss(output, target.view(-1))
return lossdef validation_step(…)
没有返回值限制,不一定非要输出一个val_loss。
During training, it’s common practice to use a small portion of the train split to determine when the model has finished training.(决定模型什么时候停止)
Split the training data
As a rule of thumb, we use 20% of the training set as the validation set. This number varies from dataset to dataset.
# use 20% of training data for validation
train_set_size = int(len(train_set) * 0.8)
valid_set_size = len(train_set) - train_set_size

# split the train set into two
seed = torch.Generator().manual_seed(42)
train_set, valid_set = data.random_split(train_set, [train_set_size, valid_set_size], generator=seed)
Define the validation loop
To add a validation loop, implement the validation_step method of the LightningModule
class LitAutoEncoder(L.LightningModule):
    def training_step(self, batch, batch_idx):
        ...

    def validation_step(self, batch, batch_idx):
        # this is the validation loop
        x, _ = batch
        x = x.view(x.size(0), -1)
        z = self.encoder(x)
        x_hat = self.decoder(z)
        val_loss = F.mse_loss(x_hat, x)
        self.log("val_loss", val_loss)
Train with the validation loop
To run the validation loop, pass in the validation set to .fit
from torch.utils.data import DataLoader

train_loader = DataLoader(train_set)
valid_loader = DataLoader(valid_set)
model = LitAutoEncoder(...)

# train with both splits
trainer = L.Trainer()
trainer.fit(model, train_loader, valid_loader)
def test_step(…)
没有返回值限制,不一定非要输出一个val_loss。
To make sure a model can generalize to an unseen dataset (ie: to publish a paper or in a production environment) a dataset is normally split into two parts, the train split and the test split.
The test set is NOT used during training, it is ONLY used once the model has been trained to see how the model will do in the real-world.
Find the train and test splits
Datasets come with two splits. Refer to the dataset documentation to find the train and test splits.
import torch.utils.data as data
from torchvision import datasets
import torchvision.transforms as transforms

# Load data sets
transform = transforms.ToTensor()
train_set = datasets.MNIST(root="MNIST", download=True, train=True, transform=transform)
test_set = datasets.MNIST(root="MNIST", download=True, train=False, transform=transform)
Define the test loop
class LitAutoEncoder(L.LightningModule):
    def training_step(self, batch, batch_idx):
        ...

    def test_step(self, batch, batch_idx):
        # this is the test loop
        x, _ = batch
        x = x.view(x.size(0), -1)
        z = self.encoder(x)
        x_hat = self.decoder(z)
        test_loss = F.mse_loss(x_hat, x)
        self.log("test_loss", test_loss)
Train with the test loop
Once the model has finished training, call .test
from torch.utils.data import DataLoader

# initialize the Trainer
trainer = Trainer()

# test the model
trainer.test(model, dataloaders=DataLoader(test_set))
def training_step_end(…)
training_step_end: 只在使用多个node进行训练且结果涉及如softmax之类需要全部输出联合运算的步骤时使用该函数。同理,validation_step_end/test_step_end。
validation_step_end
test_step_end
def training_epoch_end(…)
training_epoch_end:
- 在一个训练epoch结尾处被调用。
- 输入参数:一个List,List的内容是前面
training_step()所返回的每次的内容。 - 返回:None
def validation_epoch_end(…)
def test_epoch_end(…)
validation_epoch_end/test_epoch_end
Trainer
Trainer — PyTorch Lightning 2.5.0.post0 documentation
Saving and loading checkpoints
Saving and loading checkpoints (basic) — PyTorch Lightning 2.5.0.post0 documentation
checkpoint
When a model is training, the performance changes as it continues to see more data. It is a best practice to save the state of a model throughout the training process. This gives you a version of the model, a checkpoint, at each key point during the development of the model. Once training has completed, use the checkpoint that corresponds to the best performance you found during the training process.Checkpoints also enable your training to resume from where it was in case the training process is interrupted.PyTorch Lightning checkpoints are fully usable in plain PyTorch.
Checkpoints的组成
- 16-bit scaling factor (if using 16-bit precision training)
- Current epoch
- Global step
- LightningModule’s state_dict
- State of all optimizers
- State of all learning rate schedulers
- State of all callbacks (for stateful callbacks)
- State of datamodule (for stateful datamodules)
- The hyperparameters (init arguments) with which the model was created
- The hyperparameters (init arguments) with which the datamodule was created
- State of Loops
Save a checkpoint
Lightning automatically saves a checkpoint for you in your current working directory, with the state of your last training epoch. This makes sure you can resume training in case it was interrupted.
#(法一)
# simply by using the Trainer you get automatic checkpointing
trainer = Trainer()

#(法二)
#To change the checkpoint path use the default_root_dir argument:(改变地址)
# saves checkpoints to 'some/path/' at every epoch end
trainer = Trainer(default_root_dir="some/path/")
LightningModule from checkpoint(load from checkpoint评估模型)
To load a LightningModule along with its weights and hyperparameters use the following method:
model = MyLightningModule.load_from_checkpoint("/path/to/checkpoint.ckpt")

# disable randomness, dropout, etc...
model.eval()

# predict with the model
y_hat = model(x)
Disable checkpointing
You can disable checkpointing by passing:
trainer = Trainer(enable_checkpointing=False)Resume training state(重新恢复训练)
If you don’t just want to load weights, but instead restore the full training, do the following:
Correct usage:
model = LitModel()
trainer = Trainer()

# automatically restores model, epoch, step, LR schedulers, etc...
trainer.fit(model, ckpt_path="path/to/your/checkpoint.ckpt")
Customize checkpointing behavior(ModelCheckpoint)
Customize checkpointing behavior (intermediate) — PyTorch Lightning 2.5.0.post0 documentation
API代码 ModelCheckpoint — PyTorch Lightning 2.5.0.post0 documentation
ModelCheckpoint 是 PyTorch Lightning 提供的一个回调函数,用来在训练过程中保存模型的检查点。你可以在训练过程中通过配置它,控制何时保存模型、保存哪些模型以及根据哪些指标来选择保存的模型。
更详细的参考CallBack-Customize checkpointing behavior(ModelCheckpoint)
CallBack
- Callback 是一个自包含的程序,可以与训练流程交织在一起,而不会污染主要的研究逻辑。
- Callback 并非只会在epoch结尾调用。pytorch-lightning 提供了数十个hook(接口,调用位置)可供选择,也可以自定义callback,实现任何想实现的模块。
- 推荐使用方式是,随问题和项目变化的操作,这些函数写到lightning module里面,而相对独立,相对辅助性的,需要复用的内容则可以定义单独的模块,供后续方便地插拔使用。
API介绍 accelerators — PyTorch Lightning 2.5.0.post0 documentation
Early Stopping
EarlyStopping(monitor='early_stop_on', min_delta=0.0, patience=3, verbose=False, mode='min', strict=True):根据某个值,在数个epoch没有提升的情况下提前停止训练。
monitor (str) – quantity to be monitored. Default: ‘early_stop_on’. min_delta (float) – minimum change in the monitored quantity to qualify as an improvement, i.e. an absolute change of less than min_delta, will count as no improvement. Default: 0.0. patience (int) – number of validation epochs with no improvement after which training will be stopped. Default: 3. verbose (bool) – verbosity mode. Default: False. mode (str) – one of ‘min’, ‘max’. In ‘min’ mode, training will stop when the quantity monitored has stopped decreasing and in ‘max’ mode it will stop when the quantity monitored has stopped increasing. ** (bool) – whether to crash the training if monitor is not found in the validation metrics. Default: True.
其他参数
stopping_threshold: Stops training immediately once the monitored quantity reaches this threshold. It is useful when we know that going beyond a certain optimal value does not further benefit us.
divergence_threshold: Stops training as soon as the monitored quantity becomes worse than this threshold. When reaching a value this bad, we believes the model cannot recover anymore and it is better to stop early and run with different initial conditions.
check_finite: When turned on, it stops training if the monitored metric becomes NaN or infinite.
check_on_train_epoch_end: When turned on, it checks the metric at the end of a training epoch. Use this only when you are monitoring any metric logged within training-specific hooks on epoch-level.
Stopping an Epoch Early
Early Stopping — PyTorch Lightning 2.5.0.post0 documentation
You can stop and skip the rest of the current epoch early by overriding on_train_batch_start() to return -1 when some condition is met.
If you do this repeatedly, for every epoch you had originally requested, then this will stop your entire training.
EarlyStopping Callback
The EarlyStopping callback can be used to monitor a metric and stop the training when no improvement is observed.
To enable it:
- Import
EarlyStoppingcallback. - Log the metric you want to monitor using
log()method. - Init the callback, and set
monitorto the logged metric of your choice. - Set the
modebased on the metric needs to be monitored. - Pass the
EarlyStoppingcallback to theTrainercallbacks flag.
from lightning.pytorch.callbacks.early_stopping import EarlyStopping

class LitModel(LightningModule):
    def validation_step(self, batch, batch_idx):
        loss = ...
        self.log("val_loss", loss)

model = LitModel()
trainer = Trainer(callbacks=[EarlyStopping(monitor="val_loss", mode="min")])
trainer.fit(model)
You can customize the callbacks behaviour by changing its parameters.
early_stop_callback = EarlyStopping(monitor="val_accuracy", min_delta=0.00, patience=3, verbose=False, mode="max")
trainer = Trainer(callbacks=[early_stop_callback])
定义子类,重写父类EarlyStopping
In case you need early stopping in a different part of training, subclass EarlyStopping and change where it is called:
class MyEarlyStopping(EarlyStopping):
    def on_validation_end(self, trainer, pl_module):
        # override this to disable early stopping at the end of val loop
        pass

    def on_train_end(self, trainer, pl_module):
        # instead, do it at the end of training loop
        self._run_early_stopping_check(trainer)
[!CAUTION]
The
EarlyStoppingcallback runs at the end of every validation epoch by default. However, the frequency of validation can be modified by setting various parameters in theTrainer, for examplecheck_val_every_n_epochandval_check_interval. It must be noted that thepatienceparameter counts the number of validation checks with no improvement, and not the number of training epochs. Therefore, with parameterscheck_val_every_n_epoch=10andpatience=3, the trainer will perform at least 40 training epochs before being stopped.
ModelSummary
对训练进行debug的一种,打印输出信息
from lightning.pytorch.callbacks import ModelSummary

trainer = Trainer(callbacks=[ModelSummary(max_depth=-1)])
DeviceStatsMonitor
Measure accelerator usage
参考Finding training loop bottlenecks
from lightning.pytorch.callbacks import DeviceStatsMonitor

trainer = Trainer(callbacks=[DeviceStatsMonitor()])
Customize checkpointing behavior(ModelCheckpoint)
这对于Checkpoint更细腻度的进行设计
Customize checkpointing behavior (intermediate) — PyTorch Lightning 2.5.0.post0 documentation
ModelCheckpoint 是 PyTorch Lightning 提供的一个回调函数,用来在训练过程中保存模型的检查点。你可以在训练过程中通过配置它,控制何时保存模型、保存哪些模型以及根据哪些指标来选择保存的模型。
Modify checkpointing behavior
For fine-grained control over checkpointing behavior, use the ModelCheckpoint object
from lightning.pytorch.callbacks import ModelCheckpoint

checkpoint_callback = ModelCheckpoint(dirpath="my/path/", save_top_k=2, monitor="val_loss")
trainer = Trainer(callbacks=[checkpoint_callback])
trainer.fit(model)
checkpoint_callback.best_model_path
ModelCheckpoint(dirpath="my/path/", save_top_k=2, monitor="val_loss"):
dirpath="my/path/":指定检查点文件保存的路径。save_top_k=2:表示保存性能最好的前 2 个模型(根据监控的指标进行选择)。monitor="val_loss":表示根据验证集损失 (val_loss) 来选择保存哪些模型。你可以监控任何通过self.log记录的指标。
trainer.fit(model):开始训练模型并触发模型检查点的保存。
checkpoint_callback.best_model_path:访问保存的最佳模型的路径。
Any value that has been logged via self.log in the LightningModule can be monitored.
class LitModel(L.LightningModule):
    def training_step(self, batch, batch_idx):
        self.log("my_metric", x)

# 'my_metric' is now able to be monitored
checkpoint_callback = ModelCheckpoint(monitor="my_metric")
这里使用ModelCheckpoint来用来在训练过程中保存模型的检查点。你可以在训练过程中通过配置它,控制何时保存模型、保存哪些模型以及根据哪些指标来选择保存的模型。
同时ModelCheckpoint可以监控任意定义的指标(通过
self.log记录的指标),以记录自定义的指标,并用它来控制保存检查点.
Save checkpoints by condition(根据条件保存检查点)
To save checkpoints based on a (when/which/what/where) condition (for example when the validation_loss is lower) modify the ModelCheckpoint properties.
When
- When using iterative training which doesn’t have an epoch, you can checkpoint at every
Ntraining steps by specifyingevery_n_train_steps=N. - You can also control the interval of epochs between checkpoints using
every_n_epochs, to avoid slowdowns. - You can checkpoint at a regular time interval using the
train_time_intervalargument independent of the steps or epochs. - In case you are monitoring a training metric, we’d suggest using
save_on_train_epoch_end=Trueto ensure the required metric is being accumulated correctly for creating a checkpoint.
Which
- You can save the last checkpoint when training ends using
save_lastargument(会出现一个last.ckpt文件). - You can save top-K and last-K checkpoints by configuring the
monitorandsave_top_kargument.
from lightning.pytorch.callbacks import ModelCheckpoint

# saves top-K checkpoints based on "val_loss" metric
checkpoint_callback = ModelCheckpoint(
    save_top_k=10,
    monitor="val_loss",
    mode="min",
    dirpath="my/path/",
    filename="sample-mnist-{epoch:02d}-{val_loss:.2f}",
)

# saves last-K checkpoints based on "global_step" metric
# make sure you log it inside your LightningModule
checkpoint_callback = ModelCheckpoint(
    save_top_k=10,
    monitor="global_step",
    mode="max",
    dirpath="my/path/",
    filename="sample-mnist-{epoch:02d}-{global_step}",
)
[!CAUTION]
推荐你在
filename中传递格式化选项,包含被监控的指标(例如验证损失或其他自定义指标),以便更清晰地命名保存的检查点文件。如果你没有这样做,而是将save_top_k >= 2且enable_version_counter=True(默认情况下),系统会自动在文件名后附加一个版本号,以避免文件名冲突。但需要注意的是,你 不应该依赖于自动附加的版本号 来检索 top-k 模型,因为版本号与模型的性能没有直接关系。例如,文件名为
filename-v2.ckpt的模型不一定是性能最好的第2个模型。
You can customize the checkpointing behavior to monitor any quantity of your training or validation steps. For example, if you want to update your checkpoints based on your validation loss:
from lightning.pytorch.callbacks import ModelCheckpoint

class LitAutoEncoder(LightningModule):
    def validation_step(self, batch, batch_idx):
        x, y = batch
        y_hat = self.backbone(x)

        # 1. calculate loss
        loss = F.cross_entropy(y_hat, y)

        # 2. log val_loss
        self.log("val_loss", loss)

# 3. Init ModelCheckpoint callback, monitoring "val_loss"
checkpoint_callback = ModelCheckpoint(monitor="val_loss")

# 4. Add your callback to the callbacks list
trainer = Trainer(callbacks=[checkpoint_callback])
What
- By default, the
ModelCheckpointcallback saves model weights, optimizer states, etc., but in case you have limited disk space or just need the model weights to be saved you can specifysave_weights_only=True.
Where
- By default, the
ModelCheckpointwill save files into theTrainer.log_dir. It gives you the ability to specify thedirpathandfilenamefor your checkpoints. Filename can also be dynamic so you can inject the metrics that are being logged usinglog().
from lightning.pytorch.callbacks import ModelCheckpoint

# saves a file like: my/path/sample-mnist-epoch=02-val_loss=0.32.ckpt
checkpoint_callback = ModelCheckpoint(
    dirpath="my/path/",
    filename="sample-mnist-{epoch:02d}-{val_loss:.2f}",
)
The
ModelCheckpointcallback is very robust and should cover 99% of the use-cases. If you find a use-case that is not configured yet, feel free to open an issue with a feature request on GitHub and the Lightning Team will be happy to integrate/help integrate it.这个功能非常的常用,上面这段内容的大体意思就是ModelCheckpoint很受欢迎
Save checkpoints manually
You can manually save checkpoints and restore your model from the checkpointed state using save_checkpoint() and load_from_checkpoint().
model = MyLightningModule(hparams)
trainer.fit(model)
trainer.save_checkpoint("example.ckpt")

# load the checkpoint later as normal
new_model = MyLightningModule.load_from_checkpoint(checkpoint_path="example.ckpt")
这可以参考Trainer-Saving and loading checkpoints
[!IMPORTANT]
这里使用ModelCheckpoint就是自动的在 what which when where进行自动的保存检查点,而manually就是自己手动的保存(颗粒度较粗)
Learningratemonitor
lightning.pytorch.callbacks.LearningRateMonitor(logging_interval=None, log_momentum=False, log_weight_decay=False)[SOURCE]
Bases: Callback
Automatically monitor and logs learning rate for learning rate schedulers during training.
-
Parameters:
- logging_interval (
Optional[Literal['step','epoch']]) – set to'epoch'or'step'to loglrof all optimizers at the same interval, set toNoneto log at individual interval according to theintervalkey of each scheduler. Defaults toNone. - log_momentum (
bool) – option to also log the momentum values of the optimizer, if the optimizer has themomentumorbetasattribute. Defaults toFalse. - log_weight_decay (
bool) – option to also log the weight decay values of the optimizer. Defaults toFalse.
- logging_interval (
-
Raises:
- MisconfigurationException – If
logging_intervalis none of"step","epoch", orNone.
- MisconfigurationException – If
Example:
>>> from lightning.pytorch import Trainer
>>> from lightning.pytorch.callbacks import LearningRateMonitor
>>> lr_monitor = LearningRateMonitor(logging_interval='step')
>>> trainer = Trainer(callbacks=[lr_monitor])
Logging names are automatically determined based on optimizer class name. In case of multiple optimizers of same type, they will be named Adam, Adam-1 etc. If an optimizer has multiple parameter groups they will be named Adam/pg1, Adam/pg2 etc. To control naming, pass in a name keyword in the construction of the learning rate schedulers. A name keyword can also be used for parameter groups in the construction of the optimizer.
[!IMPORTANT]
使用logging name 是自动获取的
Example:
def configure_optimizer(self):
    optimizer = torch.optim.Adam(...)
    lr_scheduler = {
        'scheduler': torch.optim.lr_scheduler.LambdaLR(optimizer, ...)
        'name': 'my_logging_name'
    }
    return [optimizer], [lr_scheduler]
Example:
def configure_optimizer(self):
    optimizer = torch.optim.SGD(
        [{
            'params': [p for p in self.parameters()],
            'name': 'my_parameter_group_name'
        }],
        lr=0.1
    )
    lr_scheduler = torch.optim.lr_scheduler.LambdaLR(optimizer, ...)
return [optimizer], [lr_scheduler]-
on_train_batch_start(trainer, args, kwargs*)[SOURCE]
Called when the train batch begins.Return type:
None -
on_train_epoch_start(trainer, args, kwargs*)[SOURCE]
Called when the train epoch begins.Return type:
None -
on_train_start(trainer, args, kwargs*)[SOURCE]
Called before training, determines unique names for all lr schedulers in the case of multiple of the same type or in the case of multiple parameter groups.Raises:MisconfigurationException – If
Trainerhas nologger.Return type:None
GradientAccumulationScheduler(梯度累积)
Effective Training Techniques — PyTorch Lightning 2.5.0.post0 documentation
具体查看 Trainer-Effective Training Techniques(有效的训练手段)-Accumulate Gradients(累积梯度)
StochasticWeightAveraging(随机权重平均)
Effective Training Techniques — PyTorch Lightning 2.5.0.post0 documentation
具体查看 Trainer-Effective Training Techniques(有效的训练手段)-StochasticWeightAveraging(累积梯度)
查找最大批次和初始学习率
具体查看 Trainer-Effective Training Techniques(有效的训练手段)-
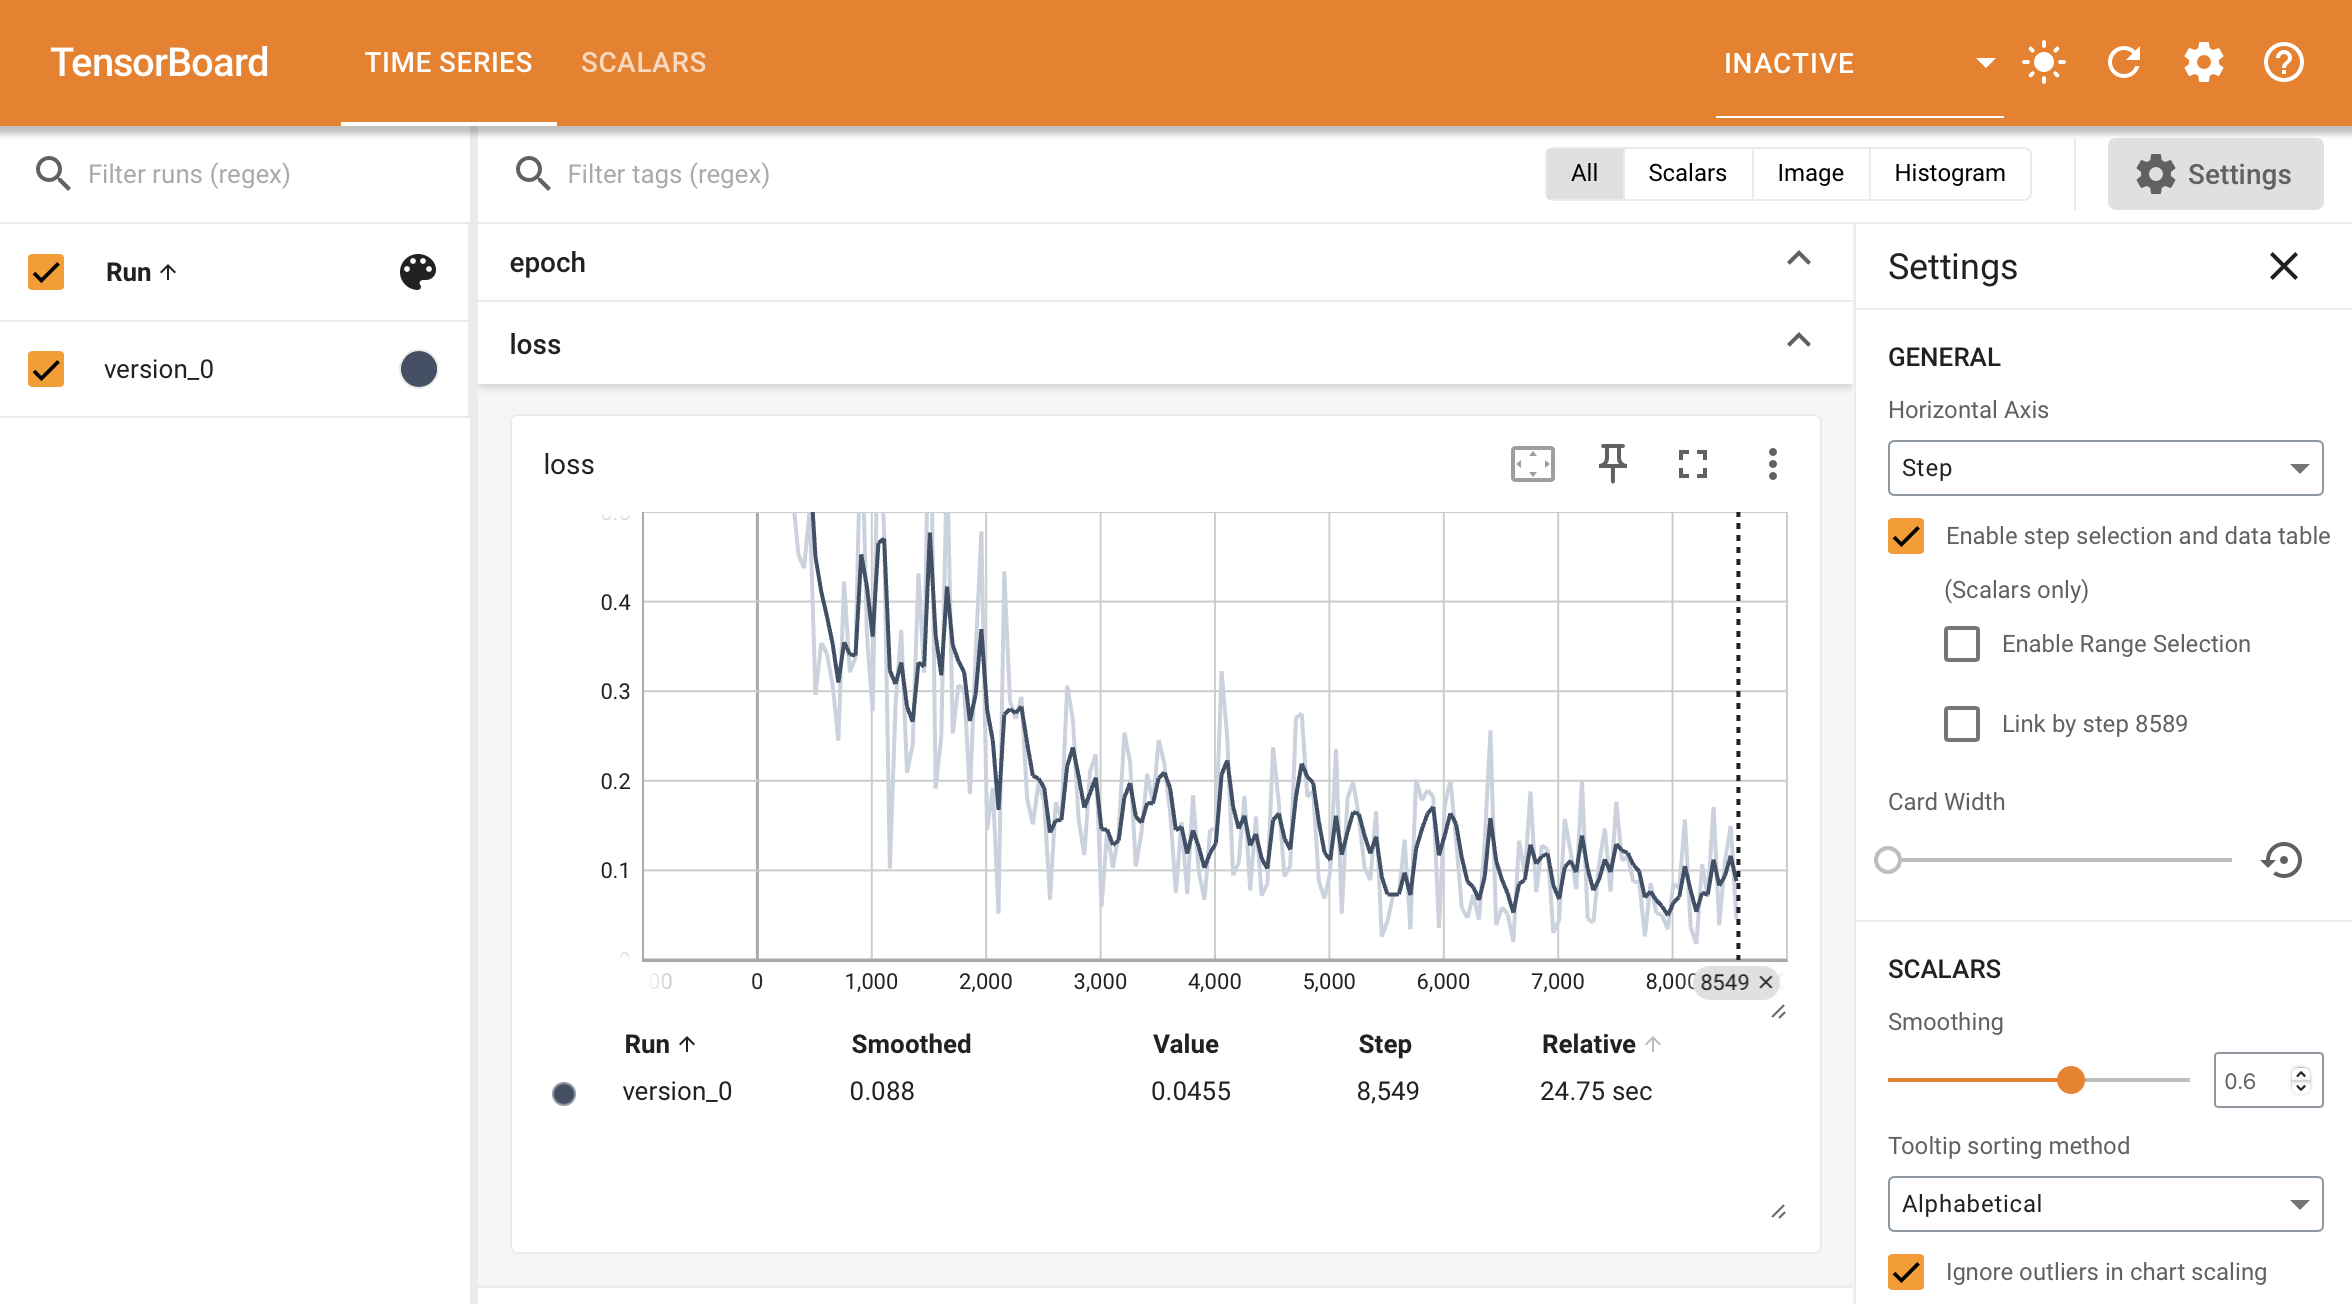
Track and visualize experiments(使用log和TensorBoard)
In model development, we track values of interest such as the validation_loss to visualize the learning process for our models. Model development is like driving a car without windows, charts and logs provide the windows to know where to drive the car.(很形象)
Track metrics
Metric visualization is the most basic but powerful way of understanding how your model is doing throughout the model development process.
To track a metric, simply use the self.log method available inside the LightningModule
class LitModel(L.LightningModule):
    def training_step(self, batch, batch_idx):
        value = ...
        self.log("some_value", value)
To log multiple metrics at once, use self.log_dict
values = {"loss": loss, "acc": acc, "metric_n": metric_n}  # add more items if needed
self.log_dict(values)
Todo
show plot of metric changing over time
View in the commandline
To view metrics in the commandline progress bar, set the prog_bar argument to True.
self.log(..., prog_bar=True)Epoch 3: 33%|███▉ | 307/938 [00:01<00:02, 289.04it/s, loss=0.198, v_num=51, acc=0.211, metric_n=0.937]View in the browser(查看TensorBoard)
正常情况
To view metrics in the browser you need to use an experiment manager with these capabilities.
By Default, Lightning uses Tensorboard (if available) and a simple CSV logger otherwise.
# every trainer already has tensorboard enabled by default (if the dependency is available)
trainer = Trainer()
To launch the tensorboard dashboard run the following command on the commandline.
tensorboard --logdir=lightning_logs/If you’re using a notebook environment such as colab or kaggle or jupyter, launch Tensorboard with this command
%reload_ext tensorboard
%tensorboard --logdir=lightning_logs/
log输出非scalar(标量)的内容,如图片,文本,直方图等等
Track and Visualize Experiments (intermediate) — PyTorch Lightning 2.5.0.post0 documentation
频数分布直方图讲解tensorboard的梯度与权重histogram图学习 – lypbendlf – 博客园 (cnblogs.com)
To track other artifacts, such as histograms or model topology graphs first select one of the many loggers supported by Lightning
from lightning.pytorch import loggers as pl_loggers

tensorboard = pl_loggers.TensorBoardLogger(save_dir="")
trainer = Trainer(logger=tensorboard)
then access the logger’s API directly
def training_step(self):
    tensorboard = self.logger.experiment
    tensorboard.add_image()
    tensorboard.add_histogram(...)
    tensorboard.add_figure(...)
tensorboard绘制直方图
 def training_step(self, batch, batch_idx):
     X, X_ml, labels = batch
     out = self(X, X_ml).squeeze()
     loss = self.loss_function(out, labels)
     self.log('loss', loss, on_step=True, on_epoch=True, prog_bar=True)

     # 绘制梯度直方图,每10个epoch记录一次

     tensorboard = self.logger.experiment
     for name, param in self.named_parameters():
         if param.grad is not None:
             tensorboard.add_histogram(f"gradients/{name}", param.grad.detach().cpu(), self.current_epoch)

     return loss
[!IMPORTANT]
Logger默认是TensorBoard,但可以指定各种主流Logger框架,如Comet.ml,MLflow,Netpune,或直接CSV文件。可以同时使用复数个logger.
from pytorch_lightning import loggers as pl_loggers

# Default
tb_logger = pl_loggers.TensorBoardLogger(
 save_dir=os.getcwd(),
 version=None,
 name='lightning_logs'
)
trainer = Trainer(logger=tb_logger)

# Or use the same format as others
tb_logger = pl_loggers.TensorBoardLogger('logs/')

# One Logger
comet_logger = pl_loggers.CometLogger(save_dir='logs/')
trainer = Trainer(logger=comet_logger)

# Save code snapshot
logger = pl_loggers.TestTubeLogger('logs/', create_git_tag=True)

# Multiple Logger
tb_logger = pl_loggers.TensorBoardLogger('logs/')
comet_logger = pl_loggers.CometLogger(save_dir='logs/')
trainer = Trainer(logger=[tb_logger, comet_logger])
默认情况下,每50个batch log一次,可以通过调整参数
TensorBoard技巧
- 使用log:如果是TensorBoard,那么:
tensorboard --logdir ./lightning_logs。在Jupyter Notebook中,可以使用:
# Start tensorboard.
%load_ext tensorboard
%tensorboard --logdir lightning_logs/
在行内打开TensorBoard。
- 小技巧:如果在局域网内开启了TensorBoard,加上flag
--bind_all即可使用主机名访问:
tensorboard --logdir lightning_logs --bind_all` -> `http://SERVER-NAME:6006/Accumulate a metric
When self.log is called inside the training_step, it generates a timeseries showing how the metric behaves over time.
However, For the validation and test sets we are not generally interested in plotting the metric values per batch of data. Instead, we want to compute a summary statistic (such as average, min or max) across the full split of data.
When you call self.log inside the validation_step and test_step, Lightning automatically accumulates the metric and averages it once it’s gone through the whole split (epoch).
def validation_step(self, batch, batch_idx):
    value = batch_idx + 1
    self.log("average_value", value)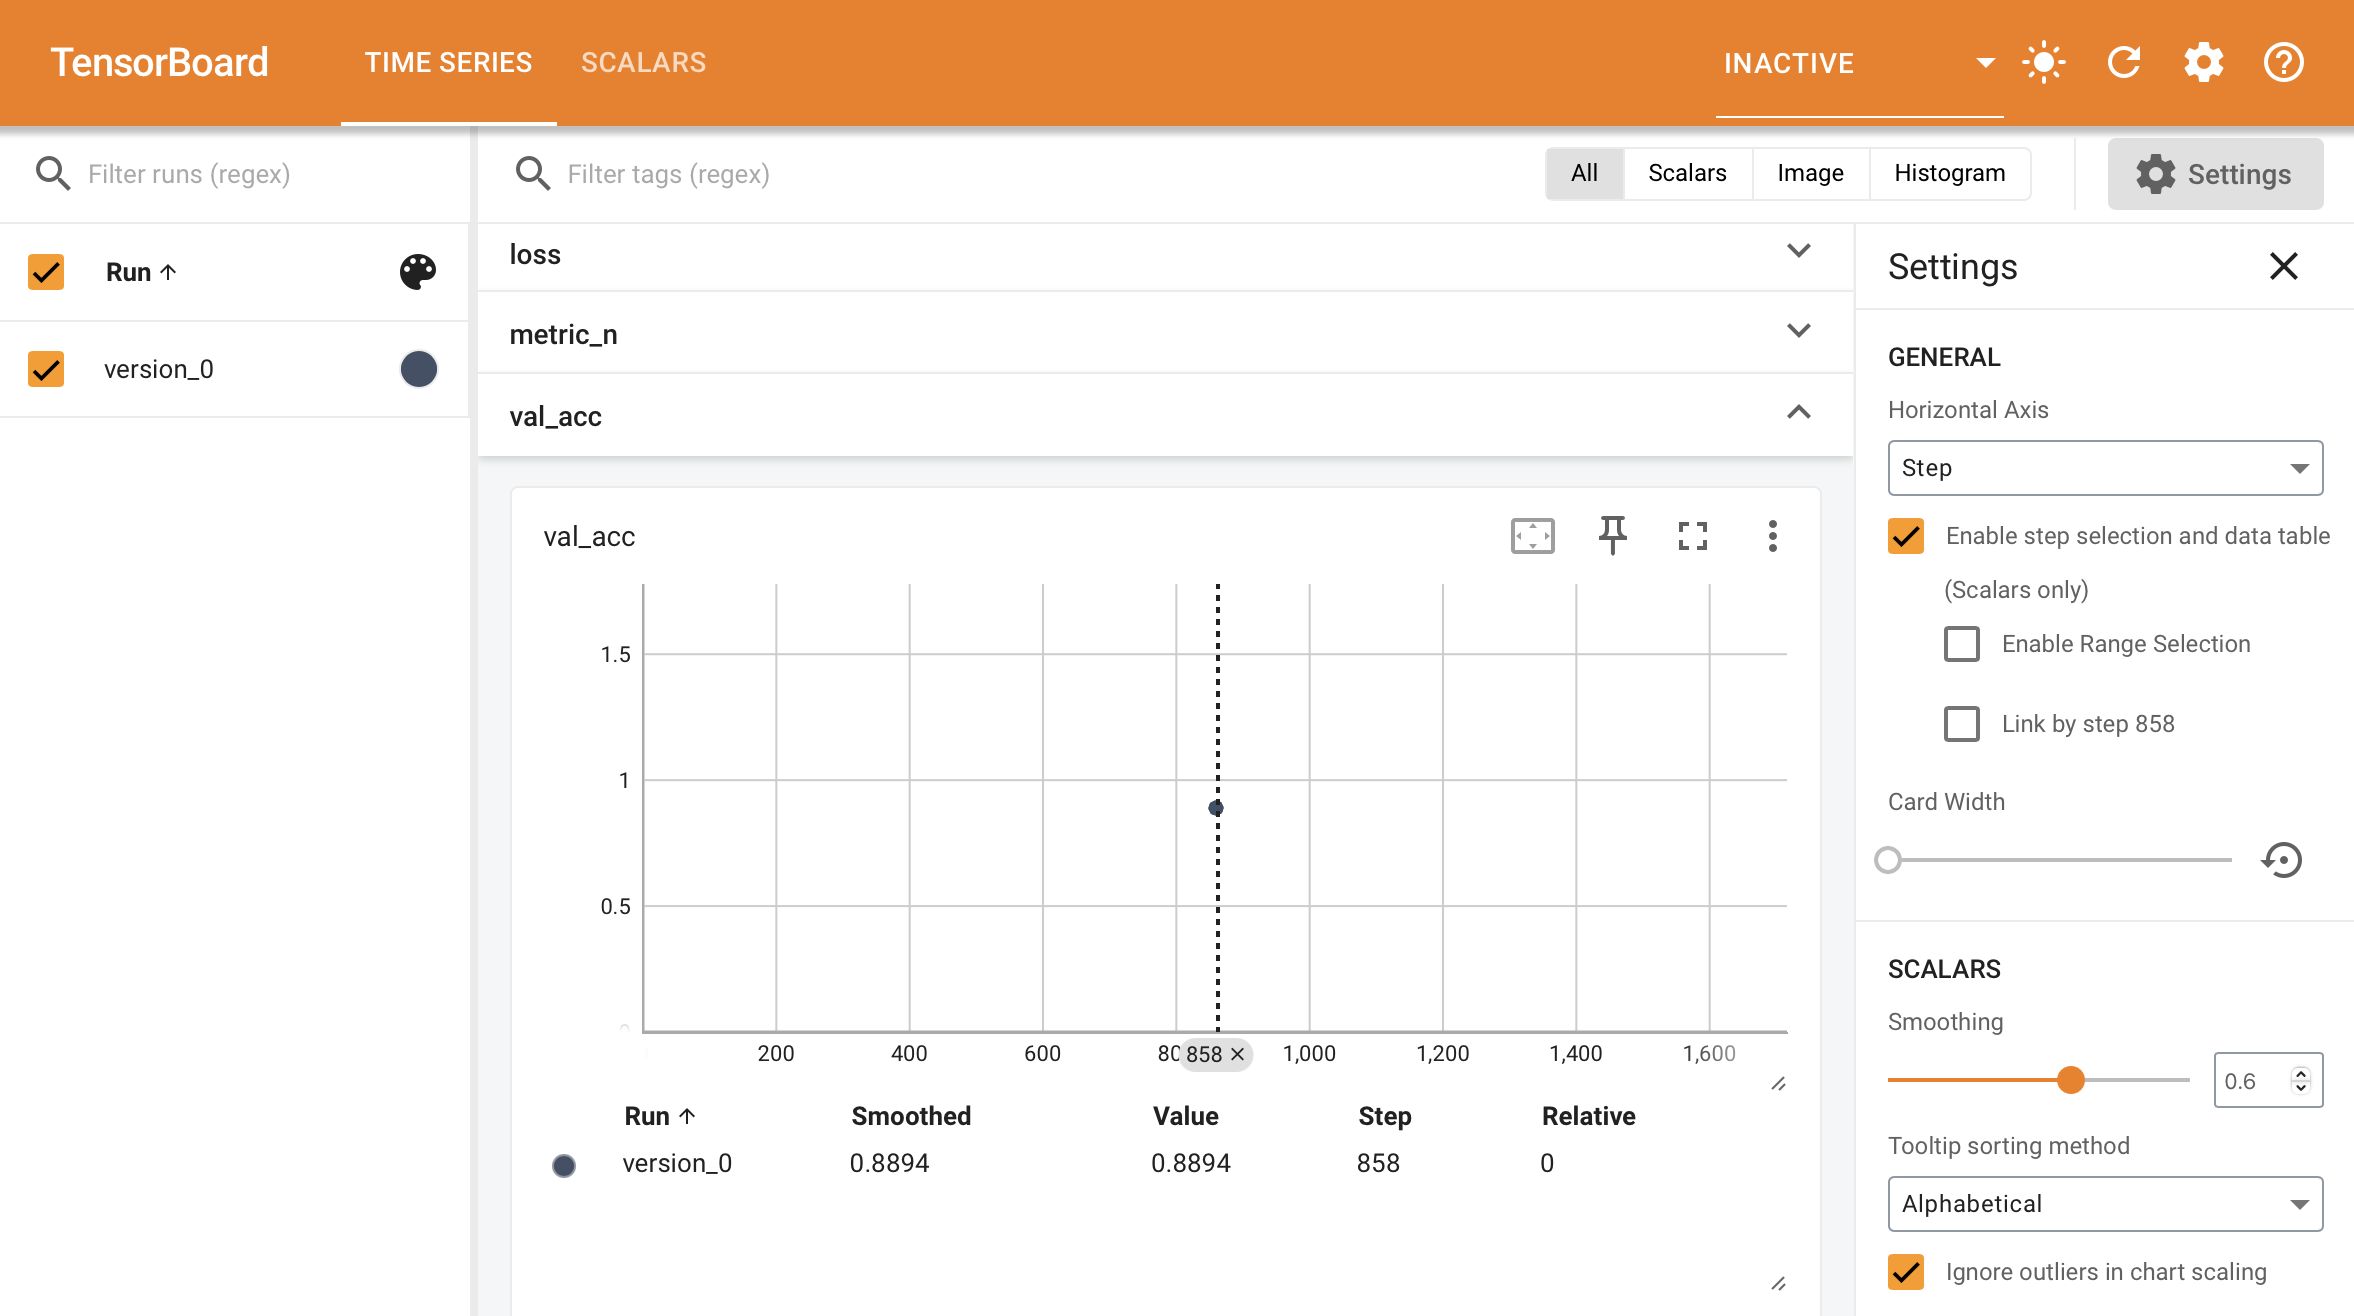
If you don’t want to average you can also choose from {min,max,sum} by passing the reduce_fx argument.
# default function
self.log(..., reduce_fx="mean")
For other reductions, we recommend logging a torchmetrics.Metric instance instead.
log配置
Track and Visualize Experiments (advanced) — PyTorch Lightning 2.5.0.post0 documentation
Change progress bar defaults
To change the default values (ie: version number) shown in the progress bar, override the get_metrics() method in your logger.
from lightning.pytorch.callbacks.progress import Tqdm

class CustomProgressBar(Tqdm):
    def get_metrics(self, *args, **kwargs):
        # don't show the version number
        items = super().get_metrics()
        items.pop("v_num", None)
        return items
Customize tracking to speed up model
Modify logging frequency
Logging a metric on every single batch can slow down training. By default, Lightning logs every 50 rows, or 50 training steps. To change this behaviour, set the log_every_n_steps Trainer flag.
k = 10
trainer = Trainer(log_every_n_steps=k)
Modify flushing frequency
Some loggers keep logged metrics in memory for N steps and only periodically flush them to disk to improve training efficiency. Every logger handles this a bit differently. For example, here is how to fine-tune flushing for the TensorBoard logger:
# Default used by TensorBoard: Write to disk after 10 logging events or every two minutes
logger = TensorBoardLogger(..., max_queue=10, flush_secs=120)

# Faster training, more memory used
logger = TensorBoardLogger(..., max_queue=100)

# Slower training, less memory used
logger = TensorBoardLogger(..., max_queue=1)
Customize self.log
The LightningModule self.log method offers many configurations to customize its behavior.
add_dataloader_idx
Default: True
If True, appends the index of the current dataloader to the name (when using multiple dataloaders). If False, user needs to give unique names for each dataloader to not mix the values.
self.log(add_dataloader_idx=True)batch_size
Default: None
Current batch size used for accumulating logs logged with on_epoch=True. This will be directly inferred from the loaded batch, but for some data structures you might need to explicitly provide it.
self.log(batch_size=32)enable_graph
Default: True
If True, will not auto detach the graph.
self.log(enable_graph=True)logger
Default: True
Send logs to the logger like Tensorboard, or any other custom logger passed to the Trainer (Default: True).
self.log(logger=True)on_epoch
Default: It varies
If this is True, that specific self.log call accumulates and reduces all metrics to the end of the epoch.
self.log(on_epoch=True)The default value depends in which function this is called
def training_step(self, batch, batch_idx):
    # Default: False
    self.log(on_epoch=False)

def validation_step(self, batch, batch_idx):
    # Default: True
    self.log(on_epoch=True)

def test_step(self, batch, batch_idx):
    # Default: True
    self.log(on_epoch=True)
on_step
Default: It varies
If this is True, that specific self.log call will NOT accumulate metrics. Instead it will generate a timeseries across steps.
self.log(on_step=True)The default value depends in which function this is called
def training_step(self, batch, batch_idx):
    # Default: True
    self.log(on_step=True)

def validation_step(self, batch, batch_idx):
    # Default: False
    self.log(on_step=False)

def test_step(self, batch, batch_idx):
    # Default: False
    self.log(on_step=False)
prog_bar
Default: False
If set to True, logs will be sent to the progress bar.
self.log(prog_bar=True)rank_zero_only
Default: False
Tells Lightning if you are calling self.log from every process (default) or only from rank 0. This is for advanced users who want to reduce their metric manually across processes, but still want to benefit from automatic logging via self.log.
- Set
False(default) if you are callingself.logfrom every process. - Set
Trueif you are callingself.logfrom rank 0 only. Caveat: you won’t be able to use this metric as a monitor in callbacks (e.g., early stopping).
# Default
self.log(..., rank_zero_only=False)

# If you call `self.log` on rank 0 only, you need to set `rank_zero_only=True`
if self.trainer.global_rank == 0:
    self.log(..., rank_zero_only=True)

# DON'T do this, it will cause deadlocks!
self.log(..., rank_zero_only=True)
reduce_fx
Default: torch.mean()
Reduction function over step values for end of epoch. Uses torch.mean() by default and is not applied when a torchmetrics.Metric is logged.
self.log(..., reduce_fx=torch.mean)sync_dist
Default: False
If True, reduces the metric across devices. Use with care as this may lead to a significant communication overhead.
self.log(sync_dist=False)sync_dist_group
Default: None
The DDP group to sync across.
import torch.distributed as dist

group = dist.init_process_group("nccl", rank=self.global_rank, world_size=self.world_size)
self.log(sync_dist_group=group)
Configure the saving directory
By default, anything that is logged is saved to the current working directory. To use a different directory, set the default_root_dir argument in the Trainer.
Trainer(default_root_dir="/your/custom/path")ArgumentParser & Lightning CLI
Lightning CLI的总体介绍
Configure hyperparameters from the CLI — PyTorch Lightning 2.5.0.post0 documentation
The ArgumentParser is a built-in feature in Python that let’s you build CLI programs. You can use it to make hyperparameters and other training settings available from the command line:
from argparse import ArgumentParser

parser = ArgumentParser()

# Trainer arguments
parser.add_argument("--devices", type=int, default=2)

# Hyperparameters for the model
parser.add_argument("--layer_1_dim", type=int, default=128)

# Parse the user inputs and defaults (returns a argparse.Namespace)
args = parser.parse_args()

# Use the parsed arguments in your program
trainer = Trainer(devices=args.devices)
model = MyModel(layer_1_dim=args.layer_1_dim)
This allows you to call your program like so:
python trainer.py --layer_1_dim 64 --devices 1Predict
Load a checkpoint and predict
The easiest way to use a model for predictions is to load the weights using load_from_checkpoint found in the LightningModule.
model = LitModel.load_from_checkpoint("best_model.ckpt")
model.eval()
x = torch.randn(1, 64)

with torch.no_grad():
    y_hat = model(x)
Predict step with your LightningModule
Loading a checkpoint and predicting still leaves you with a lot of boilerplate around the predict epoch. The predict step in the LightningModule removes this boilerplate.
class MyModel(LightningModule):
    def predict_step(self, batch, batch_idx, dataloader_idx=0):
        return self(batch)
And pass in any dataloader to the Lightning Trainer:
data_loader = DataLoader(...)
model = MyModel()
trainer = Trainer()
predictions = trainer.predict(model, data_loader)
Enable complicated predict logic
When you need to add complicated pre-processing or post-processing logic to your data use the predict step. For example here we do Monte Carlo Dropout for predictions:
class LitMCdropoutModel(L.LightningModule):
    def __init__(self, model, mc_iteration):
        super().__init__()
        self.model = model
        self.dropout = nn.Dropout()
        self.mc_iteration = mc_iteration

    def predict_step(self, batch, batch_idx):
        # enable Monte Carlo Dropout
        self.dropout.train()

        # take average of `self.mc_iteration` iterations
        pred = [self.dropout(self.model(x)).unsqueeze(0) for _ in range(self.mc_iteration)]
        pred = torch.vstack(pred).mean(dim=0)
        return pred
Enable distributed inference
By using the predict step in Lightning you get free distributed inference using BasePredictionWriter.
import torch
from lightning.pytorch.callbacks import BasePredictionWriter

class CustomWriter(BasePredictionWriter):
    def __init__(self, output_dir, write_interval):
        super().__init__(write_interval)
        self.output_dir = output_dir

    def write_on_epoch_end(self, trainer, pl_module, predictions, batch_indices):
        # this will create N (num processes) files in `output_dir` each containing
        # the predictions of it's respective rank
        torch.save(predictions, os.path.join(self.output_dir, f"predictions_{trainer.global_rank}.pt"))

        # optionally, you can also save `batch_indices` to get the information about the data index
        # from your prediction data
        torch.save(batch_indices, os.path.join(self.output_dir, f"batch_indices_{trainer.global_rank}.pt"))

# or you can set `write_interval="batch"` and override `write_on_batch_end` to save
# predictions at batch level
pred_writer = CustomWriter(output_dir="pred_path", write_interval="epoch")
trainer = Trainer(accelerator="gpu", strategy="ddp", devices=8, callbacks=[pred_writer])
model = BoringModel()
trainer.predict(model, return_predictions=False)
GPU training
GPU training (Basic) — PyTorch Lightning 2.5.0.post0 documentation
Train on GPUs
The Trainer will run on all available GPUs by default. Make sure you’re running on a machine with at least one GPU. There’s no need to specify any NVIDIA flags as Lightning will do it for you.
# run on as many GPUs as available by default
trainer = Trainer(accelerator="auto", devices="auto", strategy="auto")
# equivalent to
trainer = Trainer()

# run on one GPU
trainer = Trainer(accelerator="gpu", devices=1)
# run on multiple GPUs
trainer = Trainer(accelerator="gpu", devices=8)
# choose the number of devices automatically
trainer = Trainer(accelerator="gpu", devices="auto")
[!CAUTION]
Setting
accelerator="gpu"will also automatically choose the “mps” device on Apple sillicon GPUs. If you want to avoid this, you can setaccelerator="cuda"instead.
Choosing GPU devices
You can select the GPU devices using ranges, a list of indices or a string containing a comma separated list of GPU ids:
# DEFAULT (int) specifies how many GPUs to use per node
Trainer(accelerator="gpu", devices=k)

# Above is equivalent to
Trainer(accelerator="gpu", devices=list(range(k)))

# Specify which GPUs to use (don't use when running on cluster)
Trainer(accelerator="gpu", devices=[0, 1])

# Equivalent using a string
Trainer(accelerator="gpu", devices="0, 1")

# To use all available GPUs put -1 or '-1'
# equivalent to `list(range(torch.cuda.device_count())) and `"auto"`
Trainer(accelerator="gpu", devices=-1)
The table below lists examples of possible input formats and how they are interpreted by Lightning.
| devices | Type | Parsed | Meaning |
|---|---|---|---|
| 3 | int | [0, 1, 2] | first 3 GPUs |
| -1 | int | [0, 1, 2, …] | all available GPUs |
| [0] | list | [0] | GPU 0 |
| [1, 3] | list | [1, 3] | GPU index 1 and 3 (0-based) |
| “3” | str | [0, 1, 2] | first 3 GPUs |
| “1, 3” | str | [1, 3] | GPU index 1 and 3 (0-based) |
| “-1” | str | [0, 1, 2, …] | all available GPUs |
Find usable CUDA devices
If you want to run several experiments at the same time on your machine, for example for a hyperparameter sweep, then you can use the following utility function to pick GPU indices that are “accessible”, without having to change your code every time.
from lightning.pytorch.accelerators import find_usable_cuda_devices

# Find two GPUs on the system that are not already occupied
trainer = Trainer(accelerator="cuda", devices=find_usable_cuda_devices(2))

from lightning.fabric.accelerators import find_usable_cuda_devices

# Works with Fabric too
fabric = Fabric(accelerator="cuda", devices=find_usable_cuda_devices(2))
This is especially useful when GPUs are configured to be in “exclusive compute mode”, such that only one process at a time is allowed access to the device. This special mode is often enabled on server GPUs or systems shared among multiple users.
Debug model
Set a breakpoint
A breakpoint stops your code execution so you can inspect variables, etc… and allow your code to execute one line at a time.
def function_to_debug():
    x = 2

    # set breakpoint
    import pdb

    pdb.set_trace()
    y = x**2
In this example, the code will stop before executing the y = x**2 line.
Run all your model code once quickly(缩短训练流程)
If you’ve ever trained a model for days only to crash during validation or testing then this trainer argument is about to become your best friend.
The fast_dev_run argument in the trainer runs 5 batch of training, validation, test and prediction data through your trainer to see if there are any bugs:
trainer = Trainer(fast_dev_run=True)To change how many batches to use, change the argument to an integer. Here we run 7 batches of each:
trainer = Trainer(fast_dev_run=7)[!CAUTION]
This argument will disable tuner, checkpoint callbacks, early stopping callbacks, loggers and logger callbacks like
LearningRateMonitorandDeviceStatsMonitor.
Shorten the epoch length(缩短训练数据)
Sometimes it’s helpful to only use a fraction of your training, val, test, or predict data (or a set number of batches). For example, you can use 20% of the training set and 1% of the validation set.
On larger datasets like Imagenet, this can help you debug or test a few things faster than waiting for a full epoch.
# use only 10% of training data and 1% of val data
trainer = Trainer(limit_train_batches=0.1, limit_val_batches=0.01)

# use 10 batches of train and 5 batches of val
trainer = Trainer(limit_train_batches=10, limit_val_batches=5)
Run a Sanity Check
Trainer 会在训练的开始阶段运行两个步骤的验证,以避免在训练的深层次阶段,特别是在训练时间较长时,因验证出错导致程序崩溃。
Lightning runs 2 steps of validation in the beginning of training. This avoids crashing in the validation loop sometime deep into a lengthy training loop.
(See: num_sanity_val_steps argument of Trainer)
trainer = Trainer(num_sanity_val_steps=2)Print LightningModule weights summary
Whenever the .fit() function gets called, the Trainer will print the weights summary for the LightningModule.
trainer.fit(...)this generate a table like:
  | Name  | Type        | Params | Mode
-------------------------------------------
0 | net   | Sequential  | 132 K  | train
1 | net.0 | Linear      | 131 K  | train
2 | net.1 | BatchNorm1d | 1.0 K  | train
To add the child modules to the summary add a ModelSummary:
from lightning.pytorch.callbacks import ModelSummary

trainer = Trainer(callbacks=[ModelSummary(max_depth=-1)])
To print the model summary if .fit() is not called:
from lightning.pytorch.utilities.model_summary import ModelSummary

model = LitModel()
summary = ModelSummary(model, max_depth=-1)
print(summary)
To turn off the autosummary use:
trainer = Trainer(enable_model_summary=False)Print input output layer dimensions
Another debugging tool is to display the intermediate input- and output sizes of all your layers by setting the example_input_array attribute in your LightningModule.
class LitModel(LightningModule):
    def __init__(self, *args, **kwargs):
        self.example_input_array = torch.Tensor(32, 1, 28, 28)
With the input array, the summary table will include the input and output layer dimensions:
  | Name  | Type        | Params | Mode  | In sizes  | Out sizes
----------------------------------------------------------------------
0 | net   | Sequential  | 132 K  | train | [10, 256] | [10, 512]
1 | net.0 | Linear      | 131 K  | train | [10, 256] | [10, 512]
2 | net.1 | BatchNorm1d | 1.0 K  | train | [10, 512] | [10, 512]
when you call .fit() on the Trainer. This can help you find bugs in the composition of your layers.
Find training loop bottlenecks(找出训练瓶颈)
Profiling helps you find bottlenecks in your code by capturing analytics such as how long a function takes or how much memory is used.
Find training loop bottlenecks
The most basic profile measures all the key methods across Callbacks, DataModules and the LightningModule in the training loop.
trainer = Trainer(profiler="simple")Once the .fit() function has completed, you’ll see an output like this:
FIT Profiler Report

-------------------------------------------------------------------------------------------
|  Action                                          |  Mean duration (s) |  Total time (s) |
-------------------------------------------------------------------------------------------
|  [LightningModule]BoringModel.prepare_data       |  10.0001           |  20.00          |
|  run_training_epoch                              |  6.1558            |  6.1558         |
|  run_training_batch                              |  0.0022506         |  0.015754       |
|  [LightningModule]BoringModel.optimizer_step     |  0.0017477         |  0.012234       |
|  [LightningModule]BoringModel.val_dataloader     |  0.00024388        |  0.00024388     |
|  on_train_batch_start                            |  0.00014637        |  0.0010246      |
|  [LightningModule]BoringModel.teardown           |  2.15e-06          |  2.15e-06       |
|  [LightningModule]BoringModel.on_train_start     |  1.644e-06         |  1.644e-06      |
|  [LightningModule]BoringModel.on_train_end       |  1.516e-06         |  1.516e-06      |
|  [LightningModule]BoringModel.on_fit_end         |  1.426e-06         |  1.426e-06      |
|  [LightningModule]BoringModel.setup              |  1.403e-06         |  1.403e-06      |
|  [LightningModule]BoringModel.on_fit_start       |  1.226e-06         |  1.226e-06      |
-------------------------------------------------------------------------------------------
In this report we can see that the slowest function is prepare_data. Now you can figure out why data preparation is slowing down your training.
The simple profiler measures all the standard methods used in the training loop automatically, including:
- on_train_epoch_start
- on_train_epoch_end
- on_train_batch_start
- model_backward
- on_after_backward
- optimizer_step
- on_train_batch_end
- on_training_end
- etc…
Profile the time within every function
To profile the time within every function, use the AdvancedProfiler built on top of Python’s cProfiler.
trainer = Trainer(profiler="advanced")Once the .fit() function has completed, you’ll see an output like this:
Profiler Report

Profile stats for: get_train_batch
        4869394 function calls (4863767 primitive calls) in 18.893 seconds
Ordered by: cumulative time
List reduced from 76 to 10 due to restriction
<10>
ncalls  tottime  percall  cumtime  percall filename:lineno(function)
3752/1876    0.011    0.000   18.887    0.010 {built-in method builtins.next}
    1876     0.008    0.000   18.877    0.010 dataloader.py:344(__next__)
    1876     0.074    0.000   18.869    0.010 dataloader.py:383(_next_data)
    1875     0.012    0.000   18.721    0.010 fetch.py:42(fetch)
    1875     0.084    0.000   18.290    0.010 fetch.py:44(
<listcomp>)
    60000    1.759    0.000   18.206    0.000 mnist.py:80(__getitem__)
    60000    0.267    0.000   13.022    0.000 transforms.py:68(__call__)
    60000    0.182    0.000    7.020    0.000 transforms.py:93(__call__)
    60000    1.651    0.000    6.839    0.000 functional.py:42(to_tensor)
    60000    0.260    0.000    5.734    0.000 transforms.py:167(__call__)
If the profiler report becomes too long, you can stream the report to a file:
from lightning.pytorch.profilers import AdvancedProfiler

profiler = AdvancedProfiler(dirpath=".", filename="perf_logs")
trainer = Trainer(profiler=profiler)
Measure accelerator usage
Another helpful technique to detect bottlenecks is to ensure that you’re using the full capacity of your accelerator (GPU/TPU/HPU). This can be measured with the DeviceStatsMonitor:
from lightning.pytorch.callbacks import DeviceStatsMonitor

trainer = Trainer(callbacks=[DeviceStatsMonitor()])
[!IMPORTANT]
CPU metrics will be tracked by default on the CPU accelerator. To enable it for other accelerators set
DeviceStatsMonitor(cpu_stats=True). To disable logging CPU metrics, you can specifyDeviceStatsMonitor(cpu_stats=False).
Effective Training Techniques(有效的训练手段)
Effective Training Techniques — PyTorch Lightning 2.5.0.post0 documentation
N-BIT PRECISION
If you’re looking to run models faster or consume less memory, consider tweaking the precision settings of your models.
Lower precision, such as 16-bit floating-point, requires less memory and enables training and deploying larger models. Higher precision, such as the 64-bit floating-point, can be used for highly sensitive use-cases.
Accumulate Gradients(累积梯度)
Accumulated gradients run K small batches of size N before doing a backward pass. The effect is a large effective batch size of size KxN, where N is the batch size. Internally it doesn’t stack up the batches and do a forward pass rather it accumulates the gradients for K batches and then do an optimizer.step to make sure the effective batch size is increased but there is no memory overhead.
[!WARNING]
当使用分布式训练时(例如 DDP),假设有 P 个设备,每个设备都会独立地累积梯度,即每个设备在每次
loss.backward()后存储梯度,并且直到调用optimizer.step()时才会同步设备之间的梯度。因此,对于每个累积步骤,每个设备上的有效批次大小将保持为 NK,但在调用optimizer.step()之前,梯度同步会使得有效批次大小变为 PNK。对于 DP,因为批次是分布到各个设备上的,最终的有效批次大小将为 NK。
# DEFAULT (ie: no accumulated grads)
trainer = Trainer(accumulate_grad_batches=1)

# Accumulate gradients for 7 batches
trainer = Trainer(accumulate_grad_batches=7)
Optionally, you can make the accumulate_grad_batches value change over time by using the GradientAccumulationScheduler. Pass in a scheduling dictionary, where the key represents the epoch at which the value for gradient accumulation should be updated.
from lightning.pytorch.callbacks import GradientAccumulationScheduler

# till 5th epoch, it will accumulate every 8 batches. From 5th epoch
# till 9th epoch it will accumulate every 4 batches and after that no accumulation
# will happen. Note that you need to use zero-indexed epoch keys here
accumulator = GradientAccumulationScheduler(scheduling={0: 8, 4: 4, 8: 1})
trainer = Trainer(callbacks=accumulator)
Note: Not all strategies and accelerators support variable gradient accumulation windows.
Gradient Clipping
Gradient clipping can be enabled to avoid exploding gradients. By default, this will clip the gradient norm by calling torch.nn.utils.clip_grad_norm_() computed over all model parameters together. If the Trainer’s gradient_clip_algorithm is set to 'value' ('norm' by default), this will use instead torch.nn.utils.clip_grad_value_() for each parameter instead.
[!CAUTION]
If using mixed precision, the
gradient_clip_valdoes not need to be changed as the gradients are unscaled before applying the clipping function.SEE ALSO
# DEFAULT (ie: don't clip)
trainer = Trainer(gradient_clip_val=0)

# clip gradients' global norm to <=0.5 using gradient_clip_algorithm='norm' by default
trainer = Trainer(gradient_clip_val=0.5)

# clip gradients' maximum magnitude to <=0.5
trainer = Trainer(gradient_clip_val=0.5, gradient_clip_algorithm="value")
Read more about Configuring Gradient Clipping for advanced use-cases.
Stochastic Weight Averaging(随机权重平均)
Stochastic Weight Averaging (SWA) can make your models generalize better at virtually no additional cost. This can be used with both non-trained and trained models. The SWA procedure smooths the loss landscape thus making it harder to end up in a local minimum during optimization.
For a more detailed explanation of SWA and how it works, read this post by the PyTorch team.
SEE ALSO
The
StochasticWeightAveragingcallback
# Enable Stochastic Weight Averaging using the callback
trainer = Trainer(callbacks=[StochasticWeightAveraging(swa_lrs=1e-2)])
Batch Size Finder
Auto-scaling of batch size can be enabled to find the largest batch size that fits into memory. Large batch size often yields a better estimation of the gradients, but may also result in longer training time. Inspired by https://github.com/BlackHC/toma.
SEE ALSO
from lightning.pytorch.tuner import Tuner

# Create a tuner for the trainer
trainer = Trainer(...)
tuner = Tuner(trainer)

# Auto-scale batch size by growing it exponentially (default)
tuner.scale_batch_size(model, mode="power")

# Auto-scale batch size with binary search
tuner.scale_batch_size(model, mode="binsearch")

# Fit as normal with new batch size
trainer.fit(model)
Currently, this feature supports two modes 'power' scaling and 'binsearch' scaling. In 'power' scaling, starting from a batch size of 1 keeps doubling the batch size until an out-of-memory (OOM) error is encountered. Setting the argument to 'binsearch' will initially also try doubling the batch size until it encounters an OOM, after which it will do a binary search that will finetune the batch size. Additionally, it should be noted that the batch size scaler cannot search for batch sizes larger than the size of the training dataset.
OOM 错误 是指 Out of Memory 错误,翻译为 内存溢出 错误。它通常发生在计算机或计算设备(如 GPU)上的内存不足以处理当前任务时。在深度学习中,尤其是在训练大型神经网络时,当模型需要的内存超过了硬件(通常是 GPU 或 CPU)可用的内存时,就会触发 OOM 错误。
[!CAUTION]
This feature expects that a
batch_sizefield is either located as a model attribute i.e.model.batch_sizeor as a field in yourhparamsi.e.model.hparams.batch_size. Similarly it can work with datamodules too. The field should exist and will be updated by the results of this algorithm. Additionally, yourtrain_dataloader()method should depend on this field for this feature to work i.e.# using LightningModule class LitModel(LightningModule): def __init__(self, batch_size): super().__init__() self.save_hyperparameters() # or self.batch_size = batch_size def train_dataloader(self): return DataLoader(train_dataset, batch_size=self.batch_size | self.hparams.batch_size) model = LitModel(batch_size=32) trainer = Trainer(...) tuner = Tuner(trainer) tuner.scale_batch_size(model) # using LightningDataModule class LitDataModule(LightningDataModule): def __init__(self, batch_size): super().__init__() self.save_hyperparameters() # or self.batch_size = batch_size def train_dataloader(self): return DataLoader(train_dataset, batch_size=self.batch_size | self.hparams.batch_size) model = MyModel() datamodule = LitDataModule(batch_size=32) trainer = Trainer(...) tuner = Tuner(trainer) tuner.scale_batch_size(model, datamodule=datamodule)Note that the
train_dataloadercan be either part of theLightningModuleorLightningDataModuleas shown above. If both theLightningModuleand theLightningDataModulecontain atrain_dataloader, theLightningDataModuletakes precedence.
-
The algorithm in short works by:
Dumping the current state of the model and trainerIteratively until convergence or maximum number of tries
max_trials(default 25) has been reached:Callfit()method of trainer. This evaluatessteps_per_trial(default 3) number of optimization steps. Each training step can trigger an OOM error if the tensors (training batch, weights, gradients, etc.) allocated during the steps have a too large memory footprint.If an OOM error is encountered, decrease batch size else increase it. How much the batch size is increased/decreased is determined by the chosen strategy.The found batch size is saved to eithermodel.batch_sizeormodel.hparams.batch_sizeRestore the initial state of model and trainer
[!WARNING]
Batch size finder is not yet supported for DDP or any of its variations, it is coming soon.
Customizing Batch Size Finder
[!WARNING]
This is an experimental feature.
- You can also customize the
BatchSizeFindercallback to run at different epochs. This feature is useful while fine-tuning models since you can’t always use the same batch size after unfreezing the backbone.
from lightning.pytorch.callbacks import BatchSizeFinder

class FineTuneBatchSizeFinder(BatchSizeFinder):
    def __init__(self, milestones, *args, **kwargs):
        super().__init__(*args, **kwargs)
        self.milestones = milestones

    def on_fit_start(self, *args, **kwargs):
        return

    def on_train_epoch_start(self, trainer, pl_module):
        if trainer.current_epoch in self.milestones or trainer.current_epoch == 0:
            self.scale_batch_size(trainer, pl_module)

trainer = Trainer(callbacks=[FineTuneBatchSizeFinder(milestones=(5, 10))])
trainer.fit(...)- Run batch size finder for
validate/test/predict.
from lightning.pytorch.callbacks import BatchSizeFinder

class EvalBatchSizeFinder(BatchSizeFinder):
    def __init__(self, *args, **kwargs):
        super().__init__(*args, **kwargs)

    def on_fit_start(self, *args, **kwargs):
        return

    def on_test_start(self, trainer, pl_module):
        self.scale_batch_size(trainer, pl_module)

trainer = Trainer(callbacks=[EvalBatchSizeFinder()])
trainer.test(...)
Learning Rate Finder
For training deep neural networks, selecting a good learning rate is essential for both better performance and faster convergence. Even optimizers such as Adam that are self-adjusting the learning rate can benefit from more optimal choices.
To reduce the amount of guesswork concerning choosing a good initial learning rate, a learning rate finder can be used. As described in this paper a learning rate finder does a small run where the learning rate is increased after each processed batch and the corresponding loss is logged. The result of this is a lr vs. loss plot that can be used as guidance for choosing an optimal initial learning rate.
[!WARNING]
For the moment, this feature only works with models having a single optimizer.
[!CAUTION]
With DDP: Since all the processes run in isolation, only process with
global_rank=0will make the decision to stop the learning rate finder and broadcast its results to all other ranks. That means, at the end of LR finder, each process will be running with the learning rate found onglobal_rank=0.
Using Lightning’s built-in LR finder
To enable the learning rate finder, your lightning module needs to have a learning_rate or lr attribute (or as a field in your hparams i.e. hparams.learning_rate or hparams.lr). Then, create the Tuner via tuner = Tuner(trainer) and call tuner.lr_find(model) to run the LR finder. The suggested learning_rate will be written to the console and will be automatically set to your lightning module, which can be accessed via self.learning_rate or self.lr.
from lightning.pytorch.tuner import Tuner

class LitModel(LightningModule):
    def __init__(self, learning_rate):
        super().__init__()
        self.learning_rate = learning_rate
        self.model = Model(...)

    def configure_optimizers(self):
        return Adam(self.parameters(), lr=(self.lr or self.learning_rate))

model = LitModel()
trainer = Trainer(...)

# Create a Tuner
tuner = Tuner(trainer)

# finds learning rate automatically
# sets hparams.lr or hparams.learning_rate to that learning rate
tuner.lr_find(model)
If your model is using an arbitrary value instead of self.lr or self.learning_rate, set that value in lr_find:
model = LitModel()
trainer = Trainer(...)
tuner = Tuner(trainer)

# to set to your own hparams.my_value
tuner.lr_find(model, attr_name="my_value")
You can also inspect the results of the learning rate finder or just play around with the parameters of the algorithm. A typical example of this would look like:
model = MyModelClass(hparams)
trainer = Trainer()
tuner = Tuner(trainer)

# Run learning rate finder
lr_finder = tuner.lr_find(model)

# Results can be found in
print(lr_finder.results)

# Plot with
fig = lr_finder.plot(suggest=True)
fig.show()

# Pick point based on plot, or get suggestion
new_lr = lr_finder.suggestion()

# update hparams of the model
model.hparams.lr = new_lr

# Fit model
trainer.fit(model)
The figure produced by lr_finder.plot() should look something like the figure below. It is recommended to not pick the learning rate that achieves the lowest loss, but instead something in the middle of the sharpest downward slope (red point). This is the point returned py lr_finder.suggestion().
Customizing Learning Rate Finder
[!WARNING]
This is an experimental feature.
You can also customize the LearningRateFinder callback to run at different epochs. This feature is useful while fine-tuning models.
from lightning.pytorch.callbacks import LearningRateFinder

class FineTuneLearningRateFinder(LearningRateFinder):
    def __init__(self, milestones, *args, **kwargs):
        super().__init__(*args, **kwargs)
        self.milestones = milestones

    def on_fit_start(self, *args, **kwargs):
        return

    def on_train_epoch_start(self, trainer, pl_module):
        if trainer.current_epoch in self.milestones or trainer.current_epoch == 0:
            self.lr_find(trainer, pl_module)

trainer = Trainer(callbacks=[FineTuneLearningRateFinder(milestones=(5, 10))])
trainer.fit(...)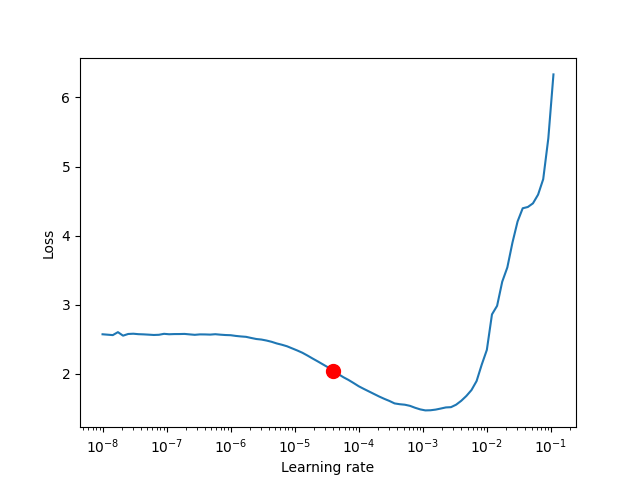
Advanced GPU Optimizations
Sharing Datasets Across Process Boundaries
DataModule
LightningDataModule — PyTorch Lightning 2.5.0.post0 documentation
A datamodule encapsulates the five steps involved in data processing in PyTorch:
- Download / tokenize / process.
- Clean and (maybe) save to disk.
- Load inside
Dataset. - Apply transforms (rotate, tokenize, etc…).
- Wrap inside a
DataLoader.
This class can then be shared and used anywhere:
model = LitClassifier()
trainer = Trainer()

imagenet = ImagenetDataModule()
trainer.fit(model, datamodule=imagenet)

cifar10 = CIFAR10DataModule()
trainer.fit(model, datamodule=cifar10)
Why do I need a DataModule?
In normal PyTorch code, the data cleaning/preparation is usually scattered across many files. This makes sharing and reusing the exact splits and transforms across projects impossible.
Datamodules are for you if you ever asked the questions:
- what splits did you use?
- what transforms did you use?
- what normalization did you use?
- how did you prepare/tokenize the data?
DataModule介绍
The LightningDataModule is a convenient way to manage data in PyTorch Lightning. It encapsulates training, validation, testing, and prediction dataloaders, as well as any necessary steps for data processing, downloads, and transformations. By using a LightningDataModule, you can easily develop dataset-agnostic models, hot-swap different datasets, and share data splits and transformations across projects.
Here’s a simple PyTorch example:
# regular PyTorch
test_data = MNIST(my_path, train=False, download=True)
predict_data = MNIST(my_path, train=False, download=True)
train_data = MNIST(my_path, train=True, download=True)
train_data, val_data = random_split(train_data, [55000, 5000])

train_loader = DataLoader(train_data, batch_size=32)
val_loader = DataLoader(val_data, batch_size=32)
test_loader = DataLoader(test_data, batch_size=32)
predict_loader = DataLoader(predict_data, batch_size=32)
The equivalent DataModule just organizes the same exact code, but makes it reusable across projects.
class MNISTDataModule(L.LightningDataModule):
    def __init__(self, data_dir: str = "path/to/dir", batch_size: int = 32):
        super().__init__()
        self.data_dir = data_dir
        self.batch_size = batch_size

    def setup(self, stage: str):
        self.mnist_test = MNIST(self.data_dir, train=False)
        self.mnist_predict = MNIST(self.data_dir, train=False)
        mnist_full = MNIST(self.data_dir, train=True)
        self.mnist_train, self.mnist_val = random_split(
            mnist_full, [55000, 5000], generator=torch.Generator().manual_seed(42)
        )

    def train_dataloader(self):
        return DataLoader(self.mnist_train, batch_size=self.batch_size)

    def val_dataloader(self):
        return DataLoader(self.mnist_val, batch_size=self.batch_size)

    def test_dataloader(self):
        return DataLoader(self.mnist_test, batch_size=self.batch_size)

    def predict_dataloader(self):
        return DataLoader(self.mnist_predict, batch_size=self.batch_size)

    def teardown(self, stage: str):
        # Used to clean-up when the run is finished
        ...
But now, as the complexity of your processing grows (transforms, multiple-GPU training), you can let Lightning handle those details for you while making this dataset reusable so you can share with colleagues or use in different projects.
mnist = MNISTDataModule(my_path)
model = LitClassifier()

trainer = Trainer()
trainer.fit(model, mnist)
Here’s a more realistic, complex DataModule that shows how much more reusable the datamodule is.
import lightning as L
from torch.utils.data import random_split, DataLoader

# Note - you must have torchvision installed for this example
from torchvision.datasets import MNIST
from torchvision import transforms

class MNISTDataModule(L.LightningDataModule):
    def __init__(self, data_dir: str = "./"):
        super().__init__()
        self.data_dir = data_dir
        self.transform = transforms.Compose([transforms.ToTensor(), transforms.Normalize((0.1307,), (0.3081,))])

    def prepare_data(self):
        # download
        MNIST(self.data_dir, train=True, download=True)
        MNIST(self.data_dir, train=False, download=True)

    def setup(self, stage: str):
        # Assign train/val datasets for use in dataloaders
        if stage == "fit":
            mnist_full = MNIST(self.data_dir, train=True, transform=self.transform)
            self.mnist_train, self.mnist_val = random_split(
                mnist_full, [55000, 5000], generator=torch.Generator().manual_seed(42)
            )

        # Assign test dataset for use in dataloader(s)
        if stage == "test":
            self.mnist_test = MNIST(self.data_dir, train=False, transform=self.transform)

        if stage == "predict":
            self.mnist_predict = MNIST(self.data_dir, train=False, transform=self.transform)

    def train_dataloader(self):
        return DataLoader(self.mnist_train, batch_size=32)

    def val_dataloader(self):
        return DataLoader(self.mnist_val, batch_size=32)

    def test_dataloader(self):
        return DataLoader(self.mnist_test, batch_size=32)

    def predict_dataloader(self):
        return DataLoader(self.mnist_predict, batch_size=32)
LightningDataModule API
To define a DataModule the following methods are used to create train/val/test/predict dataloaders:
- prepare_data (how to download, tokenize, etc…)
- setup (how to split, define dataset, etc…)
- train_dataloader
- val_dataloader
- test_dataloader
- predict_dataloader
prepare_data
Downloading and saving data with multiple processes (distributed settings) will result in corrupted data. Lightning ensures the prepare_data() is called only within a single process on CPU, so you can safely add your downloading logic within. In case of multi-node training, the execution of this hook depends upon prepare_data_per_node. setup() is called after prepare_data and there is a barrier in between which ensures that all the processes proceed to setup once the data is prepared and available for use.
- download, i.e. download data only once on the disk from a single process
- tokenize. Since it’s a one time process, it is not recommended to do it on all processes
- etc…
class MNISTDataModule(L.LightningDataModule):
    def prepare_data(self):
        # download
        MNIST(os.getcwd(), train=True, download=True, transform=transforms.ToTensor())
        MNIST(os.getcwd(), train=False, download=True, transform=transforms.ToTensor())
[!WARNING]
prepare_datais called from the main process. It is not recommended to assign state here (e.g.self.x = y) since it is called on a single process and if you assign states here then they won’t be available for other processes.
setup
There are also data operations you might want to perform on every GPU. Use setup() to do things like:
- count number of classes
- build vocabulary
- perform train/val/test splits
- create datasets
- apply transforms (defined explicitly in your datamodule)
- etc…
import lightning as L

class MNISTDataModule(L.LightningDataModule):
    def setup(self, stage: str):
        # Assign Train/val split(s) for use in Dataloaders
        if stage == "fit":
            mnist_full = MNIST(self.data_dir, train=True, download=True, transform=self.transform)
            self.mnist_train, self.mnist_val = random_split(
                mnist_full, [55000, 5000], generator=torch.Generator().manual_seed(42)
            )

        # Assign Test split(s) for use in Dataloaders
        if stage == "test":
            self.mnist_test = MNIST(self.data_dir, train=False, download=True, transform=self.transform)
For eg., if you are working with NLP task where you need to tokenize the text and use it, then you can do something like as follows:
class LitDataModule(L.LightningDataModule):
    def prepare_data(self):
        dataset = load_Dataset(...)
        train_dataset = ...
        val_dataset = ...
        # tokenize
        # save it to disk

    def setup(self, stage):
        # load it back here
        dataset = load_dataset_from_disk(...)
This method expects a stage argument. It is used to separate setup logic for trainer.{fit,validate,test,predict}.
[!CAUTION]
setup is called from every process across all the nodes. Setting state here is recommended.
[!CAUTION]
teardown can be used to clean up the state. It is also called from every process across all the nodes.
train_dataloader
Use the train_dataloader() method to generate the training dataloader(s). Usually you just wrap the dataset you defined in setup. This is the dataloader that the Trainer fit() method uses.
import lightning as L

class MNISTDataModule(L.LightningDataModule):
    def train_dataloader(self):
        return DataLoader(self.mnist_train, batch_size=64)
val_dataloader
Use the val_dataloader() method to generate the validation dataloader(s). Usually you just wrap the dataset you defined in setup. This is the dataloader that the Trainer fit() and validate() methods uses.
import lightning as L

class MNISTDataModule(L.LightningDataModule):
    def val_dataloader(self):
        return DataLoader(self.mnist_val, batch_size=64)
test_dataloader
Use the test_dataloader() method to generate the test dataloader(s). Usually you just wrap the dataset you defined in setup. This is the dataloader that the Trainer test() method uses.
import lightning as L

class MNISTDataModule(L.LightningDataModule):
    def test_dataloader(self):
        return DataLoader(self.mnist_test, batch_size=64)
predict_dataloader
Use the predict_dataloader() method to generate the prediction dataloader(s). Usually you just wrap the dataset you defined in setup. This is the dataloader that the Trainer predict() method uses.
import lightning as L

class MNISTDataModule(L.LightningDataModule):
    def predict_dataloader(self):
        return DataLoader(self.mnist_predict, batch_size=64)
transfer_batch_to_device
此钩子函数用于将数据批次(batch)传输到指定的设备(如 CPU、GPU 或 TPU)。如果 DataLoader 返回的批次是自定义数据结构,需要覆盖此钩子函数来定义如何将数据传输到目标设备。
LightningDataModule.transfer_batch_to_device(batch, device, dataloader_idx)
Override this hook if your DataLoader returns tensors wrapped in a custom data structure.
The data types listed below (and any arbitrary nesting of them) are supported out of the box:
torch.Tensoror anything that implements .to(…)listdicttuple
For anything else, you need to define how the data is moved to the target device (CPU, GPU, TPU, …).
[!CAUTION]
This hook should only transfer the data and not modify it, nor should it move the data to any other device than the one passed in as argument (unless you know what you are doing). To check the current state of execution of this hook you can use
self.trainer.training/testing/validating/predictingso that you can add different logic as per your requirement.
- Parameters:
- Return type:
- Returns:
- A reference to the data on the new device.
Example:
def transfer_batch_to_device(self, batch, device, dataloader_idx):
    if isinstance(batch, CustomBatch):
        # move all tensors in your custom data structure to the device
        batch.samples = batch.samples.to(device)
        batch.targets = batch.targets.to(device)
    elif dataloader_idx == 0:
        # skip device transfer for the first dataloader or anything you wish
        pass
    else:
        batch = super().transfer_batch_to_device(batch, device, dataloader_idx)
    return batch
SEE ALSO
move_data_to_device()apply_to_collection()
on_before_batch_transfer
此钩子函数用于将数据批次(batch)传输到指定的设备(如 CPU、GPU 或 TPU)。如果 DataLoader 返回的批次是自定义数据结构,需要覆盖此钩子函数来定义如何将数据传输到目标设备。
LightningDataModule.on_before_batch_transfer(batch, dataloader_idx)
Override to alter or apply batch augmentations to your batch before it is transferred to the device.
[!CAUTION]
To check the current state of execution of this hook you can use
self.trainer.training/testing/validating/predictingso that you can add different logic as per your requirement.Parameters:
- batch (
Any) – A batch of data that needs to be altered or augmented. - dataloader_idx (
int) – The index of the dataloader to which the batch belongs.
Return type:
Returns:
- A batch of data
Example:
def on_before_batch_transfer(self, batch, dataloader_idx):
    batch['x'] = transforms(batch['x'])
    return batch
SEE ALSO
on_after_batch_transfer()transfer_batch_to_device()
on_after_batch_transfer
此钩子函数允许在数据批次被转移到设备之后,对数据进行修改或增强。可以在此处对已经转移到 GPU 等设备上的数据进行后处理。
LightningDataModule.on_after_batch_transfer(batch, dataloader_idx)
Override to alter or apply batch augmentations to your batch after it is transferred to the device.
[!CAUTION]
To check the current state of execution of this hook you can use
self.trainer.training/testing/validating/predictingso that you can add different logic as per your requirement.Parameters:
- batch (
Any) – A batch of data that needs to be altered or augmented. - dataloader_idx (
int) – The index of the dataloader to which the batch belongs.
Return type:
Returns:
- A batch of data
Example:
def on_after_batch_transfer(self, batch, dataloader_idx):
    batch['x'] = gpu_transforms(batch['x'])
    return batch
SEE ALSO
on_before_batch_transfer()transfer_batch_to_device()
load_state_dict
LightningDataModule.load_state_dict(state_dict)[SOURCE]
Called when loading a checkpoint, implement to reload datamodule state given datamodule state_dict.
Parameters:
Return type:
state_dict
LightningDataModule.state_dict()[SOURCE]
Called when saving a checkpoint, implement to generate and save datamodule state.
Return type:
Returns:
A dictionary containing datamodule state.
teardown
teardown 是 PyTorch Lightning 中的一个钩子方法,用于在训练、验证、测试或预测的结束时执行清理工作。它在模型训练周期的结束阶段调用,通常用于释放资源、清理状态或执行其他任何必要的后处理操作。
LightningDataModule.teardown(stage)
Called at the end of fit (train + validate), validate, test, or predict.
Parameters:
stage (str) – either 'fit', 'validate', 'test', or 'predict'
Return type:
prepare_data_per_node
If set to True will call prepare_data() on LOCAL_RANK=0 for every node. If set to False will only call from NODE_RANK=0, LOCAL_RANK=0.
class LitDataModule(LightningDataModule):
    def __init__(self):
        super().__init__()
        self.prepare_data_per_node = True
Using a DataModule
The recommended way to use a DataModule is simply:
dm = MNISTDataModule()
model = Model()
trainer.fit(model, datamodule=dm)
trainer.test(datamodule=dm)
trainer.validate(datamodule=dm)
trainer.predict(datamodule=dm)
If you need information from the dataset to build your model, then run prepare_data and setup manually (Lightning ensures the method runs on the correct devices).
dm = MNISTDataModule()
dm.prepare_data()
dm.setup(stage="fit")

model = Model(num_classes=dm.num_classes, width=dm.width, vocab=dm.vocab)
trainer.fit(model, dm)

dm.setup(stage="test")
trainer.test(datamodule=dm)
You can access the current used datamodule of a trainer via trainer.datamodule and the current used dataloaders via the trainer properties train_dataloader(), val_dataloaders(), test_dataloaders(), and predict_dataloaders().
DataModules without Lightning
You can of course use DataModules in plain PyTorch code as well.
# download, etc...
dm = MNISTDataModule()
dm.prepare_data()

# splits/transforms
dm.setup(stage="fit")

# use data
for batch in dm.train_dataloader():
    ...

for batch in dm.val_dataloader():
    ...

dm.teardown(stage="fit")

# lazy load test data
dm.setup(stage="test")
for batch in dm.test_dataloader():
    ...

dm.teardown(stage="test")
But overall, DataModules encourage reproducibility by allowing all details of a dataset to be specified in a unified structure.
Hyperparameters in DataModules
Like LightningModules, DataModules support hyperparameters with the same API.
import lightning as L

class CustomDataModule(L.LightningDataModule):
    def __init__(self, *args, **kwargs):
        super().__init__()
        self.save_hyperparameters()

    def configure_optimizers(self):
        # access the saved hyperparameters
        opt = optim.Adam(self.parameters(), lr=self.hparams.lr)
Refer to save_hyperparameters in lightning module for more details.
Save DataModule state
When a checkpoint is created, it asks every DataModule for their state. If your DataModule defines the state_dict and load_state_dict methods, the checkpoint will automatically track and restore your DataModules.
import lightning as L

class LitDataModule(L.LightningDataModule):
    def state_dict(self):
        # track whatever you want here
        state = {"current_train_batch_index": self.current_train_batch_index}
        return state

    def load_state_dict(self, state_dict):
        # restore the state based on what you tracked in (def state_dict)
        self.current_train_batch_index = state_dict["current_train_batch_index"]
留言